You just made one of the most significant investments in your home, and the last thing you want is to watch it deteriorate ahead of schedule. A new roof in Washington state faces real challenges from the start: persistent rainfall, moss-friendly humidity, and seasonal storms that test every shingle and seal. The good news is that a straightforward maintenance routine can add years to your roof's life, protect your warranty, and keep repair costs low. This guide walks you through exactly what to do, when to do it, and how to spot problems before they become expensive.
Table of Contents
- What you need before starting roof maintenance
- Step-by-step routine for roof maintenance
- Troubleshooting: Addressing common roof issues early
- Mastering seasonal maintenance for Washington roofs
- How the pros can help protect your new roof
- Why minimal maintenance isn't worth the risk—an expert's view
- Ready to protect your roof investment?
- Frequently asked questions
Key Takeaways
| Point | Details |
|---|---|
| Biannual self-inspection | Check your roof every spring and fall to catch issues early. |
| Annual professional check | A yearly inspection by a roofing pro helps maintain your warranty and spot hidden problems. |
| Document maintenance | Keep detailed records and photos, which are vital for warranty and insurance claims. |
| Seasonal adjustments | Adapt your maintenance routine to Washington’s weather for best results. |
What you need before starting roof maintenance
Now that you understand why ongoing attention is crucial, let's cover what you'll need before beginning routine maintenance.
Starting without the right tools is like driving without a map. You might get somewhere, but you'll waste time and miss things along the way. Many experts recommend preparing a maintenance toolkit and understanding warranty requirements before undertaking any work on your roof.
Your basic maintenance toolkit should include:
- A sturdy extension ladder rated for your roof height
- Roof boots or soft-soled shoes with good grip
- A garden hose with an adjustable nozzle
- A bright flashlight or headlamp for low-light inspection
- A caulking gun and compatible roofing sealant
- Binoculars for ground-level visual checks
- A waterproof notebook or phone app for logging observations
Before you touch anything, pull out your warranty paperwork. Whether you chose GAF roof systems or went with choosing CertainTeed materials, both manufacturers have specific maintenance requirements that must be followed to keep coverage valid. Missing a step could mean a denied claim later.
Safety is non-negotiable. Always work with a partner who can hold the ladder and call for help if needed. Never go on the roof alone, in wet conditions, or on icy surfaces. Washington winters make roofs slippery, and a fall is far more costly than any repair.
Pro Tip: Take a full photo series of your roof immediately after installation. Photograph every slope, every valley, every flashing point, and every penetration like vents and chimneys. These baseline images are invaluable if you ever need to file a warranty claim or dispute storm damage with your insurance company.
| Tool | Purpose | Estimated cost |
|---|---|---|
| Extension ladder | Safe roof access | $150–$400 |
| Roof boots | Traction and safety | $30–$80 |
| Caulking gun + sealant | Sealing gaps and flashings | $20–$50 |
| Flashlight/headlamp | Attic and low-light inspection | $15–$40 |
| Garden hose | Debris removal and drainage testing | $20–$60 |
Create a maintenance log from day one. Record every inspection date, what you found, and what you did about it. This paper trail protects you in warranty and insurance conversations and helps you spot patterns over time.
Step-by-step routine for roof maintenance
With your toolkit prepared, you can move confidently into a routine that keeps your roof in peak condition.
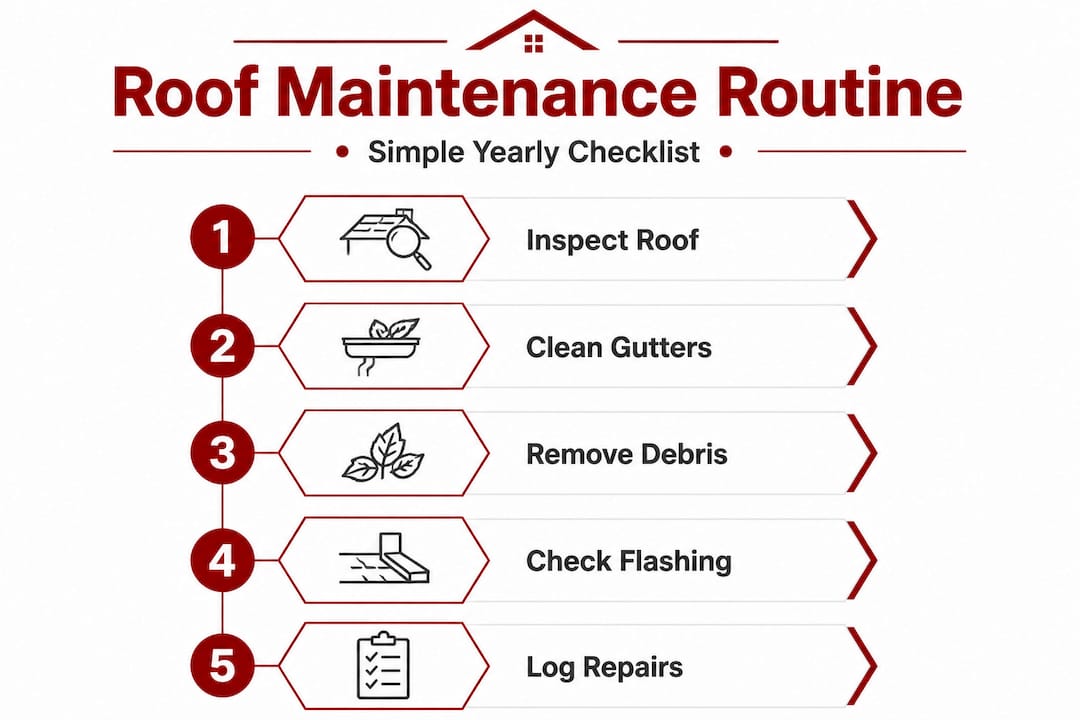
A consistent schedule is what separates roofs that last 30 years from those that need replacement in 15. Most experts recommend a biannual self-inspection and an annual professional inspection to preserve roof longevity and warranty coverage. Here is a practical numbered routine to follow:
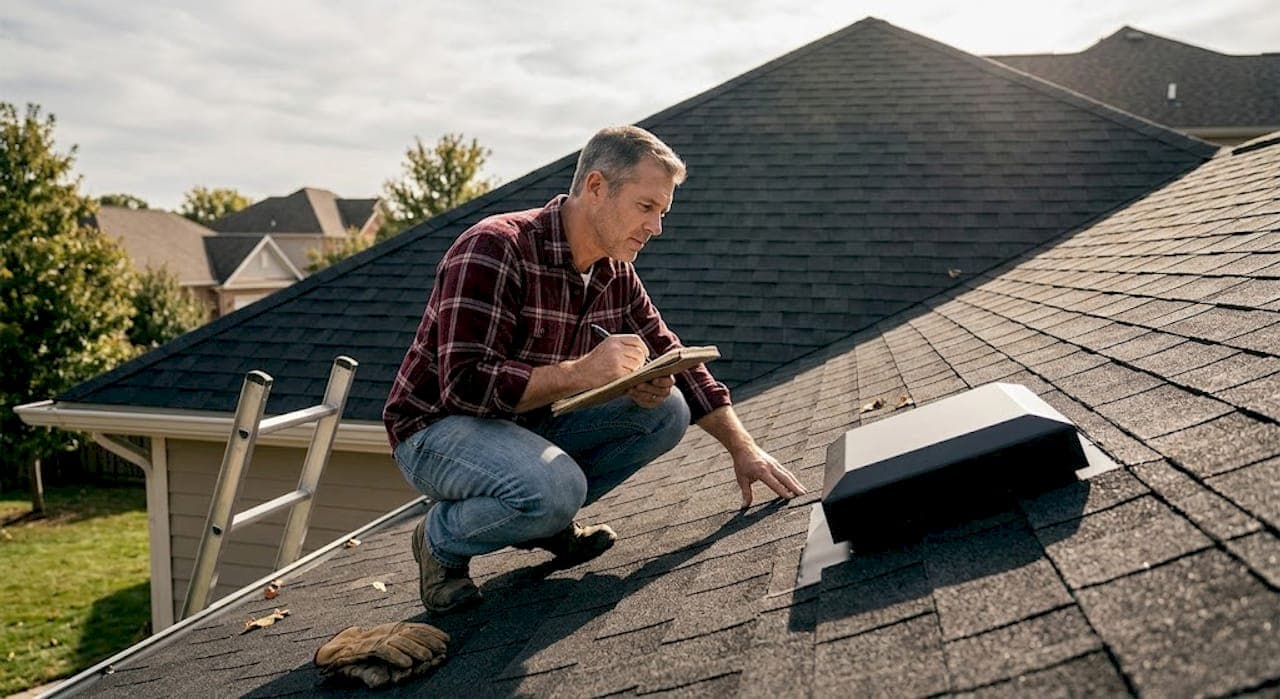
- Walk the perimeter first. Before climbing anything, walk around your home and look up. Use binoculars to scan for lifted, cracked, or missing shingles. Look for granule loss, which shows up as discoloration or bare patches on asphalt shingles.
- Inspect flashings and penetrations. Flashings are the metal strips that seal joints around chimneys, vents, skylights, and walls. These are the most common entry points for water. Look for rust, separation, or cracked caulking.
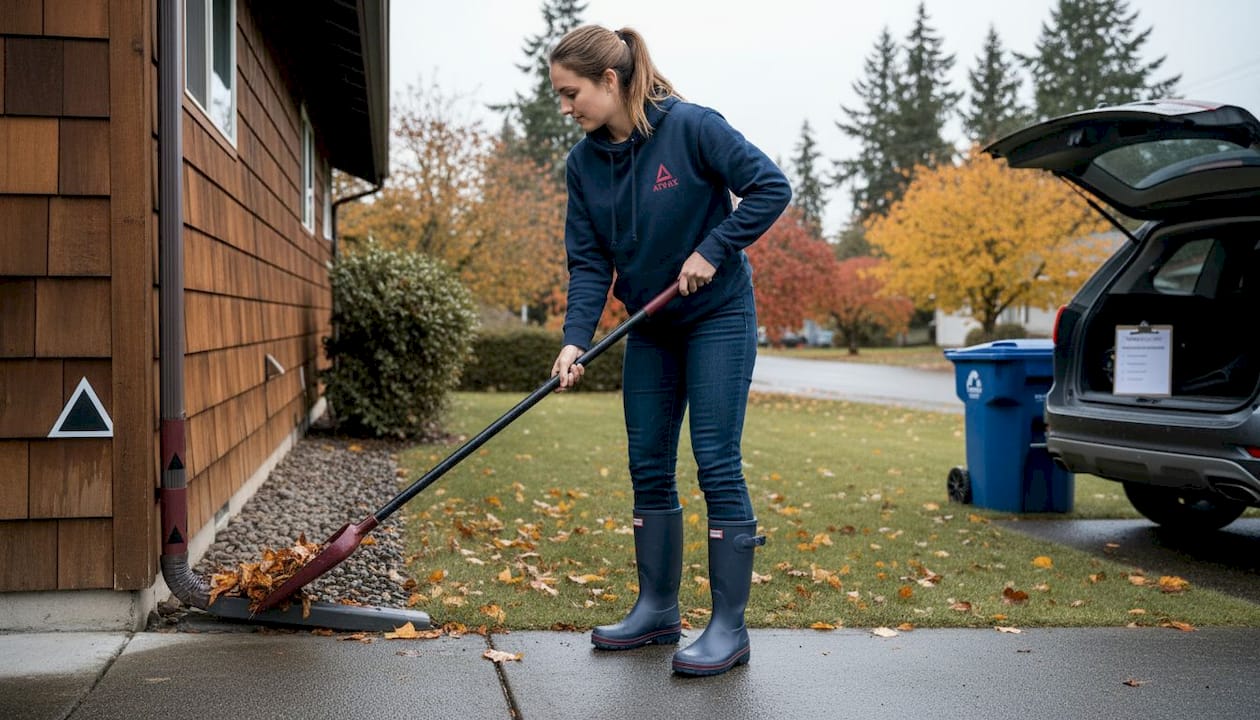
- Check the gutters. Scoop out debris and check that gutters are firmly attached and pitched correctly toward downspouts. Look inside for an excessive buildup of granules, which signals shingle wear.
- Clear the roof surface. Remove leaves, branches, and any debris that has collected in valleys or around penetrations. Standing debris holds moisture and accelerates deterioration.
- Inspect the attic. On a bright day, go into your attic and look for any pinpoints of light coming through the roof deck. Check for staining, soft spots, or mold, which all point to moisture intrusion.
- Touch up caulking and sealant. Anywhere you see cracked or missing sealant around flashings or penetrations, apply fresh roofing-grade caulk. This is one of the simplest and most effective maintenance tasks you can do.
- Schedule your annual professional inspection. A licensed roofer will check areas you cannot safely access and provide a written report you can keep for your records.
Pro Tip: Time your two self-inspections for early spring and late fall. Spring catches any damage from winter storms, and fall prepares your roof for the heavy rainfall season ahead. You can read more about adapting roof care to each season to stay one step ahead.
| Task | DIY or professional | Frequency |
|---|---|---|
| Visual surface inspection | DIY | Twice a year |
| Gutter cleaning | DIY | 3–4 times a year |
| Caulking touch-ups | DIY | As needed |
| Flashing inspection | DIY (visual) or professional | Twice a year |
| Full professional inspection | Professional | Once a year |
| Moss treatment | Professional recommended | As needed |
| Structural assessment | Professional | After major storms |
Troubleshooting: Addressing common roof issues early
Routine checks can prevent surprises, but knowing how to troubleshoot problems is also key for roof longevity.
Washington's climate is particularly hard on roofs. The combination of moisture, shade, and mild temperatures creates ideal conditions for moss and algae growth. Failing to address minor issues like small leaks or unsealed flashing can lead to larger, costlier problems down the road.
Common warning signs to watch for:
- Loose or curling shingles: These allow water underneath and are often caused by improper nailing or age-related shrinkage.
- Clogged gutters: Water backing up under the eaves is a leading cause of interior ceiling damage and rot.
- Moss or algae growth: Green or black streaks on shingles hold moisture against the surface and break down the asphalt layer over time.
- Granules in gutters: A significant amount of granules in the gutter means your shingles are losing their protective coating.
- Daylight in the attic: Any visible light from outside means there is a gap somewhere in your roof system.
- Stains on interior ceilings: Water stains inside your home are a sign that moisture has already breached your roof and is working its way in.
"A leak the size of a nail hole can cause major water damage before it's visible."
That quote reflects something we see regularly. By the time a homeowner notices a stain on their ceiling, water may have been sitting in the insulation and wood framing for weeks. Catching issues early is always far cheaper than repairing the downstream damage.
Some problems are genuinely DIY-friendly. Recaulking a flashing, clearing a blocked downspout, or removing moss with a zinc sulfate treatment are all tasks a careful homeowner can handle. But if you see structural sagging, widespread shingle damage, or active leaking, call a professional immediately. You can start by scheduling roof cleaning for moss and debris issues, or move straight to fixing roof issues if you suspect damage.
If a storm hits, do a visual check from the ground within 24 hours. Document everything with photos and notes. Contact your insurance company if you see significant damage, and reach out to your roofing contractor before making any temporary repairs so you do not accidentally affect your claim.
Mastering seasonal maintenance for Washington roofs
Troubleshooting is important, but adapting your upkeep throughout the year keeps your roof ready for whatever Washington weather brings.
Changing seasons bring new risks to roofs. Humidity and moss in spring, intense sun in summer, heavy rainfall in fall, and snow loads in winter are all Washington-specific concerns that require different responses.
Spring:
- Inspect for winter storm damage, including lifted flashings and cracked shingles
- Remove any branches or debris that fell during winter storms
- Check for moss or algae that thrived during wet months and treat it promptly
- Test downspouts by running a hose through them to confirm they are clear
Summer:
- Inspect for any UV-related cracking or blistering on shingles, which is more common on south-facing slopes
- Remove any debris that has built up in valleys during spring storms
- Reseal any caulking that dried out or cracked during warmer temperatures
- This is the best time for professional inspections since dry weather makes access safer
Fall:
- Clean gutters frequently as leaves accumulate quickly in October and November
- Check that all downspouts are clear before the heavy rain season begins
- Inspect and clear any gutter care issues before the first major storm
- Look for any shingles that are starting to lift and secure them before wind events
Winter:
- If heavy snow accumulates, use a roof rake from the ground to remove it from the lower edges
- Never walk on an icy roof. The risk of injury is not worth any maintenance task
- Monitor your attic for condensation or frost, which signals a ventilation problem
- Check for ice dams forming at the eaves and address them quickly to prevent water backup under shingles
Pro Tip: Set recurring calendar reminders right now for the first week of March, June, September, and December. Each reminder should prompt a quick 15-minute visual check. This simple habit, combined with seasonal roof repair prep, will catch the vast majority of problems before they escalate.
How the pros can help protect your new roof
DIY maintenance goes far, but collaborating with local professionals can make a big difference in roof performance and peace of mind.
Annual professional maintenance may be required to preserve warranty coverage and maximize roof life. This is not just a recommendation. Many GAF and CertainTeed warranties include language that requires documented professional inspections at regular intervals.
What a professional inspection typically includes:
- A full surface check of every shingle field, valley, and ridge
- Close inspection of all flashings, including chimney, pipe boot, and wall flashings
- Evaluation of ventilation and soffit conditions
- Gutter condition and attachment assessment
- A written report with photos and recommended actions
- Verification that installation details still meet manufacturer specifications
Professional hiring cleaning specialists can also address moss and algae in ways that DIY treatments often cannot match. Professionals use low-pressure washing techniques and commercial-grade treatments that remove growth without damaging shingles, which is a common mistake with DIY pressure washing.
Written inspection reports are also valuable beyond just maintenance. If you ever need to make a warranty claim or file an insurance claim after storm damage, a documented history of professional maintenance significantly strengthens your position. It shows you cared for the roof properly and that any damage was caused by an external event, not neglect.
When choosing a service provider, look for contractors who are licensed, bonded, and insured in Washington state. Ask whether they are certified by your shingle manufacturer. Certified contractors for pro roof repair and professional roof replacement guidance have additional training and access to enhanced warranty programs that standard contractors cannot offer.
Why minimal maintenance isn't worth the risk—an expert's view
We have seen both sides of this. Homeowners who stay on top of their roofs and homeowners who figure they will deal with problems when they come up. The difference in outcomes is stark.
There is a minority view online that some experts advocate for minimal maintenance, suggesting you inspect every five years and recaulk as needed. We understand the appeal. It saves time and feels low-risk on a brand-new roof. But in Washington, that approach is genuinely dangerous to your investment.
Here is what we actually see happen. A homeowner skips inspections for three or four years. Moss takes hold in a shaded valley. Water starts working under a flashing that shifted slightly during a windstorm. By year five, there is rot in the decking beneath, and what would have been a $200 repair has become a $3,000 job. Worse, if the warranty requires documented maintenance and you have none, you are paying for all of it yourself.
"Cutting corners on maintenance might save an afternoon, but could cost you thousands if problems go undetected."
We back this up with what we see on real-life roof care outcomes across the communities we serve. The roofs that perform best over 20 to 30 years are not always the most expensive ones. They are the ones that were checked consistently and addressed promptly when something came up.
The majority expert position, biannual self-inspection plus annual professional inspection, is the right call for Washington homeowners. It is not excessive. It is proportionate to the climate and the value of the investment you are protecting.
Pro Tip: Keep a dedicated folder, physical or digital, with your installation paperwork, warranty documents, inspection reports, and maintenance photos. If you ever need to talk to an insurance adjuster or make a warranty claim, having organized documentation puts you in a much stronger position than most homeowners.
Ready to protect your roof investment?
If this guide has shown you anything, it is that consistent care is the single most powerful thing you can do to protect your new roof. At Atrax Roof & Gutter, we make that easy.

Whether you need a professional inspection, moss treatment, or repairs after a storm, our licensed and insured team is ready to help. We serve Kirkland, Bothell, Redmond, Bellevue, Seattle, and the surrounding communities with honest work and no-surprise pricing. Explore our professional roof repair services, browse our see our project portfolio to see the quality we deliver, or check out our financing options if you want to spread out the cost of a larger project. Your roof protects your family. We protect your roof.
Frequently asked questions
How often should I inspect my new roof?
You should inspect your roof at least twice a year, once in spring and once in fall, plus schedule an annual professional inspection to preserve your warranty and catch hidden issues.
Will skipping maintenance affect my roof warranty?
Yes. Many warranties require proof of regular maintenance, and annual professional maintenance may be required to preserve warranty coverage, meaning neglect could leave you paying out of pocket for covered repairs.
What is the biggest roof maintenance mistake homeowners make?
The most common mistake is ignoring small issues. Failing to address minor issues like moss growth or a small leak can quickly escalate into structural damage that costs thousands to fix.
Do I need a professional roof inspection every year?
Yes, a yearly professional inspection is highly recommended and may be required by your warranty. A professional inspection also provides written documentation that protects you in insurance and warranty situations.
Is gutter care really part of roof maintenance?
Absolutely. Clogged or damaged gutters cause water to back up under your shingles and along your fascia, making gutter maintenance a direct part of keeping your roof healthy and leak-free.